Voting

Wednesday, November 7, 2012

What is your gift?


I am honored to attend a women's bible study called "Within The Word." We meet every Wednesday morning and we are led by a wonderful, Godly woman, Kathy Patton.  Her passion, love and gift is to bring God's word to women every week.   Through her teachings, many lives have been touched and changed.


We break for the holidays, so she can re-charge and study, so she can bring us more lessons.
We all wanted to show our appreciation, so I thought an album with pictures through the years would be a great gift.

I used to think that I didn't have any specific gift, especially anything special,  always comparing myself to other's talents.
Thankfully, I realized one day, God gives us each a different gift, and it's up to us to use it to glorify him and to bless others.

I started with adding a small journal to the front of the inside cover.  Each lady wrote a note of gratitude to Kathy.  It's tucked into a a plastic pocket I added.

Each page will have photos, in addition, each page holds a tag in a hidden pocket where I have added more pictures or special song lyrics.


I decorated pages with different laces and trims.

I also added special elements through out the book.  A pocket was made from a square doily, and I added a special scripture.
One page I added an accordion page where she can record blessings, praises and answered prayers.
I made 3 vellum bookmarks and stamped them with "faith, love, and hope."
I also made a page with a small envelope and filled it with vintage scripture cards.
On the he inside of the back cover, I added a journaling card , with one of my favorite scriptures.

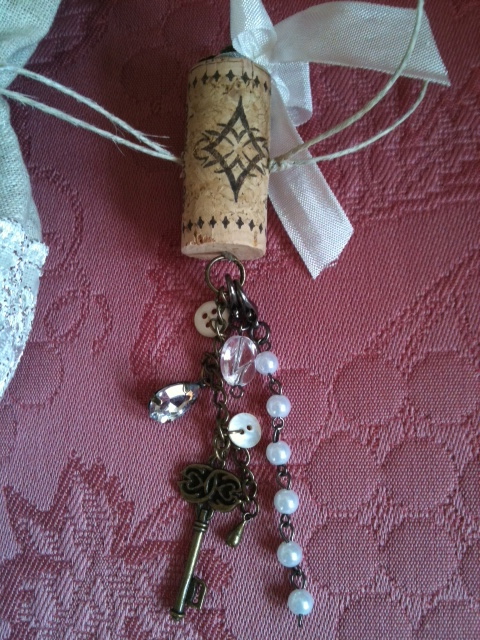
To the binding, I made combined different charms and beads and threaded it through an eyelet.
I filled the album with over 30 photos that had been taken through the years.  It documented the journey from our early years and they show how we've grown- not in numbers, but in wisdom.  It documented  heartaches and more importantly, answered prayers.

I know making this album, is my gift, and a way to show appreciation to a woman that has changed my life.  I hope each of you recognize your gift and you use it in a way to bless others.

Monday, October 15, 2012

Autumn


I have always loved Fall.  The cool mornings and evenings, the smell of the first time the heater is turned on for the year, candles burning and soup cooking in the crock pot, give me a warm feeling inside.


I love the colors of Autumn and the all the decor that comes with the season.  It's the beginning of a season of holidays and I really get motivated to create.

I decided to make some Halloween tags for the girls.  I love candy corn and I incorporated the candy into a tag.
I found these cute little plastic tubes and filled them with jelly beans, m&m's and candy corn.  I also found cute little hair clips and 2 of my granddaughters have just had their ears pierce.  I found some
cute little Halloween earrings and placed them into the eyes of the attached black cats.


The hair clips, I just added to the top of the tags.  I rubber stamped the owl image and embossed with black embossing powder.
I made several different tags, all with candy, but no earrings for the younger girls yet.


I found some spider rings at Michaels and added one to the top of the candy tube.  Martha Stewart has this cool black glitter that looks like a black cat's hair when standing on edge!


For the 2 younger girls, I thought a tag, the shape of the candy corn would be cute.  I added black ric rac, flowers and 3 stickers.


I also found some miniature black clothes pins and just added a pumpkin sticker.

Another tube filled with my favorite candies.

Michaels have the cutest ribbons out for Halloween.  I combined the candy corn ribbon with glimmer misted seam binding.


I have a seasonal tree that I decorate for each holiday.  It's always fun to see the look on the girl's faces when I change the decorations.  Alessondra helped me this year with the 
fall tree.


So I look forward to cooler weather, holiday baking and the house filled with the scent of pumpkin and cinnamon and little granddaughters saying "more candy corn please, Nindy"
                                                     

Wednesday, September 5, 2012

Hostess gifts

The wonderful thing about crafting is there is a world out there of so many talented people who share their talent and ideas.   They inspire and encourage you to think out side of the box and to try new things.

I know it's been a while since I posted.  The past couple of months have been crazy-busy.  I had some minor surgery, celebrated 40 years of marriage and had an extended cruise thanks to "Hurricane Isaac"

Before we left on our vacation, our sons and their wives thru us a wonderful 40th Anniversary party.

   It was so fun to see old friends, new friends, and even took a picture of half the wedding party - 40 years later.


  Where does time go?  What was I thinking when I picked out my wedding dress?


Anyway, I was 19, cut me some slack!  Hopefully, my taste has changed and evolved a little bit.

Okay, back  to the wine bags.  My son had an over abundance of corks, left over from wine bottles. I borrowed some to use as the "closures" of the bags.  Believe it or not, not all corks are created equally.   Some are easier to pierce than others.  Try to choose corks that are more "pressed together" than a looser cork.
Here is one of the closures I'm talking about:
You will be running a tapestry needle with thin cording thru the cork, so that is why it makes such a difference.  You can decorate the cork anyway you want and add charms and pearls, and flowers, or leave it plain.

It is very easy to put together, just sew up a side, bottom and sew in a casing for the cord.   You can make it out of any material and embellish how you like.

The theme of our anniversary party was vintage/elegance, so I thought the linen and lace would be a good fit.
Remember, all wine bottles are not the same size, so I suggest you buy the bottles first, then make your pattern from their size. ( I always learn the hard way, so I had to take my bags with me and made sure the bottles would fit.)

If you embellish your corks, make sure to use a secure glue to hold your items on.  It will be sliding back and forth, so it will be handled alot.
These would also work for bottles of "sparkling water" for those of us that prefer non-alcoholic beverages.

I hope you give these a try.  Also , please visit Linda at http://cardsbylinda.blogspot.com.   She is the wonderful, talented lady that inspired me to make these gifts.

Wednesday, June 27, 2012

Fancy packaging

I have found it is just as fun decorating and packaging the project , as it is to make the project.

I didn't have a gift bag big enough for my baby album, so I just made one.  I used some teal fabric out of my stash.  I just folded a 1/4 yard of fabric in half and sewed up the sides.  I cut the top with pinking shears and had a gift bag in 5 minutes.


I ripped a 4 inch piece of linen into a strip, frayed it on the edges with a wire brush, and tied it into a bow.   I added a flower, seam binding  and small flowers to the ends of the bow.

I made a tag , cut from a manila folder, and embellished it.  I made a ribbon rose from a teal and beige organic ribbon, lace,  and added other flowers and leaves.
You now have 2 gifts in one.  The bag can be "re-purposed" , and the gift that is in the bag.
My fabric stash now will be getting smaller, because all I want to do is make gift bags.   I would love to see any "fancy packaging" you do with a gift.  Send me a photo.  "Happy Wrapping!"

Sunday, June 24, 2012

Baby Frame/ Album

It's always exciting when a new baby is coming into your family.  I always make a special gift for my nieces and nephew's first baby.  How do you make a gift when there is no theme, no colors, no names, and no sex of the baby yet???  (They are waiting to pick all this out when the baby comes.)

I went to their baby registry and saw that the new "baby neutrals" are blues, greens, oranges, and brown.   So I took the colors from the onsies and baby accessories they picked out and began to create.

I didn't just want to just alter a frame; I wanted it to be more than a frame, so this is what I came up with.


I took and 8x10 frame and added a piece to each side of the frame.  The inside of the left side of the frame can be used to document the weight and height of the baby for the first year.
The right side of the frame is for pictures for each month of the first year.
When attached, it looks like this.  The picture frame can be used for their favorite baby picture.
The outside of the book was fun to create.  I cut a tree branch from a wood grain paper and placed it where leaves would overlap the next page.  I placed magnets in the leaves and under the paper on the adjoining side so it would automatically close magnetically.
I finished up with flowers, trims and flourishes.


I hope "mommy and daddy" enjoy the gift, and they know that alot of love went into creating it.
I anxiously await the birth of my next "great nephew or niece."
Here is the baby card: (sorry, had to do some pink and blue!)