Voting

Monday, August 26, 2013

Shabby cabinet labels

For the past several months, I have been re-vamping my craft room.  I have a wonderful "organizer" coming in to help me once a week to get everything separated, donated and organized.

I have 5 large cabinets that have upper and lower shelves.   The storage they provide is wonderful.  Now that I have changed everything around, I need labels to show where everything is located.  Each cabinet holds different supplies that are grouped together.
It's amazing how fast and how much you accumulate when you are a crafter.  They are constantly releasing new products every week.

I bought these cabinets years ago at Sam's.   They were a plain white, and of course I don't like "plain."
I glued ribbon all the way around the recessed areas.  I then used a heart stamp, loaded it with paint and stamped a heart on each panel.  
I also changed out the plain white door knobs with shabby rose knobs.

I used a "Sizzix" die to make the mason jars labels.  I had some distressed metallic paper I used to make the lids of the jars.   I scored 3 lines to give it an embossed look.

Having a label maker has helped me so much with the organizing process.  I purchased a "Brother P-touch" from Office Depot.  It is very user friendly!
I cut up a paper doily and added a strip under the lid and finished it with some jute and flowers.
I hot glued a ribbon to the back of the jar, so it could hang from the door knob.
Now, at a glance, I know what supplies are where without having to open each door to find an item!
 Here are a few pics of drawers and cabinets that have been organized.
When I have finished the whole craft room, I will post more pictures.  It is so nice to walk into a room and know where everything is!

Thursday, August 8, 2013

Standing Mini Album


If you are a crafter, than you know that youtube and ustream have changed the crafting world in a big way.  At your finger tips you have videos of every new product that comes out and where you can buy it with a click of a "paypal" button.  Each paper company not only releases 5/6 new paper lines every 6 months, but each one has it's own flowers, stickers and embellishments that match that line.

Each company also has design team members that make a project a week out of the new products, which entices us to want to buy the "showcased products." Then, if that wasn't enough, there are classes on every night of the week on ustream by designers, showing you how to make the projects and just in case you haven't spent enough money already, they just reinforce the thought- " we need more!"

It doesn't take long before you have more product coming in than projects going out.  This creates an abundant overflow in your craft room.  I predict in not so long future, there will be rehab for crafters.

When I found that I had no more places for any more supplies and couldn't remember what I had bought, it was time for a plan of action.   I was given a wonderful gift for Mother's day- a professional organizer.  The best gift I have ever received. ( In case you are interested- Amy at simplicty4u.net is who I am using.)

Amy is a woman with a label making machine, and not afraid to use it!!  She has organized, helped me purge, rearranged my supplies for better access and has labeled all my supplies.  It is such a good feeling to know where everything is, opening a closet door without bracing yourself for an avalanche, and having space to craft!  It is life changing- I highly recommend it.


So, with all that said, I have been very motivated to create.   This album I created this week is from a wonderful designer-Stephanie Miller (withinagrin.blogspot.net)   I love everything she makes.  I used the same paper line and embellishments she used because I fell so in love with her project.

This album is made out of paper bags and chipboard and is designed to stand up.  A ribbon with a magnetized flower attaches the front to the back to helps keep it closed and standing.

Each page has a pocket to hold a tag.
I love all the rich colors that are in this paper line.  They make a great back ground for any photo.


I used a bottle cap to attach to the front , glued it to a flower petal and pink glass beads were placed around the bottle cap.
I'm on to another mini album- trying to keep the ratio of more supplies going out than coming in.:)

Tuesday, August 6, 2013

Next generation quilters

I remember the first time I learned to sew.  I was 8 years old.  I just sewed random pieces of scrap material together , and even though it didn't make anything useful, the satisfaction it gave me that I created something out of scraps was the best feeling in the world!!!!    My mom then would give me felt shapes and I sewed sequins and tiny beads until they were covered.   We placed them on a Christmas table cloth all around the edge and I thought I was an expert sewer by then.

Back in the day, Home ec. was still a required in junior high.  I took half a semester of sewing and the other half was cooking.   Part of my grade was having to wear to school a garment I made in class.  I prayed it would stay together just long enough to get me through my classes, and it did.   I knew sewing was something I would do the rest of my life.   I made most of my clothes during my high school years.

About 20 years ago, about 5 of our family members took quilting lessons at Francis Tuttle Vo tech.
That was so much fun and I fell in love with quilting.  I went on to take more lessons at Oklahoma Quilt works (okquiltworks.com) in Casady Square.  If you have not ever been there, I really encourage you to go check it out.  It is a sea of fabrics, thread, patterns and home made quilts hung on every wall.
They offer classes for  the very beginner, to the very advanced.

In the summer, they offer kid's camps and offer a variety of projects to make.  You have to be at least 8 years old to take their classes.

So many of the arts are slowly dying or not being offered to our young adults.  There is a whole other world for our young people to experience, if we only make them available to them and encourage them.

All of my grand daughters are very talented and crafty and show interest in crafting, painting and sewing.

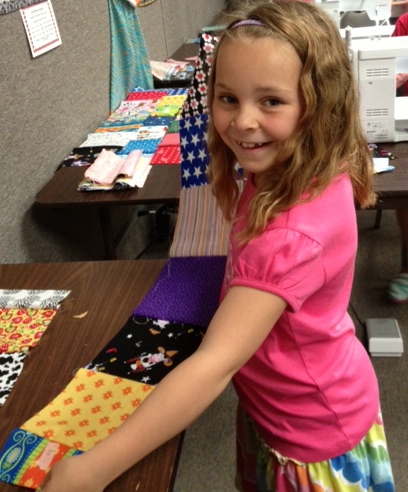
This past week, Alessondra, my oldest grand daughter, took a 5 day class to learn how to quilt.  When I saw the size of the quilt they would be making, I must say, I had my doubts.  12 rows with 7 blocks to each row.  For a beginner, that is quite a big project.

Each day, I was pleasantly surprised with what she got accomplished in a 3 hour period.  Now 3 hours to sit at one project is challenging for me, much less, a social butterfly like Alessondra.  The teacher said she stayed very focused and hardly talked. (Hmmmmmm- I re-verified we were both talking about the same child here!


The class came with a kit with the pre-cut blocks, but each girl was able to shop in the fabric store for the backing they wanted for their quilt.  This was one of Alessondra's favorite part- to choose her own fabric.
On Wednesday, she had successfully sewn all her blocks and rows together and was ready for the next step, quilting the front to the back fabric.   It won't shock many of you to know that she picked out a fabric with "owls" for her backing.
On Friday, 9 little girls stood proudly with their finished quilts for a picture.  I could see the same look of accomplishment " I felt "so many years ago.   I hope as each one of my grand daughters turn 8, they will let me introduce them to the world of sewing and quilting.   And the extra bonus- a warm feeling on the outside to match their inside.  Nindy is so proud of you!