Voting

Wednesday, September 5, 2012

Hostess gifts

The wonderful thing about crafting is there is a world out there of so many talented people who share their talent and ideas.   They inspire and encourage you to think out side of the box and to try new things.

I know it's been a while since I posted.  The past couple of months have been crazy-busy.  I had some minor surgery, celebrated 40 years of marriage and had an extended cruise thanks to "Hurricane Isaac"

Before we left on our vacation, our sons and their wives thru us a wonderful 40th Anniversary party.

   It was so fun to see old friends, new friends, and even took a picture of half the wedding party - 40 years later.


  Where does time go?  What was I thinking when I picked out my wedding dress?


Anyway, I was 19, cut me some slack!  Hopefully, my taste has changed and evolved a little bit.

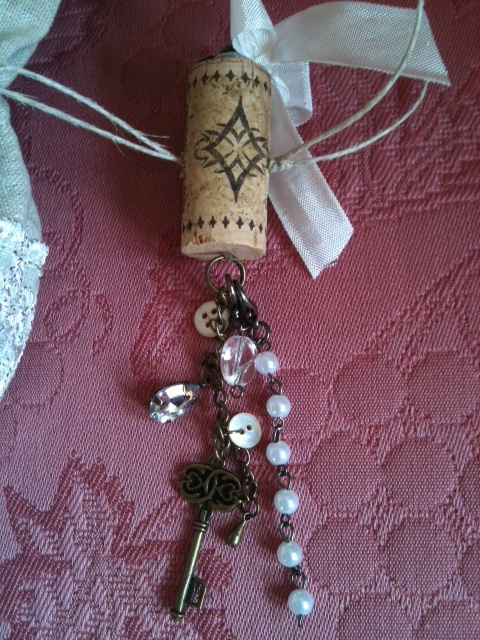
Okay, back  to the wine bags.  My son had an over abundance of corks, left over from wine bottles. I borrowed some to use as the "closures" of the bags.  Believe it or not, not all corks are created equally.   Some are easier to pierce than others.  Try to choose corks that are more "pressed together" than a looser cork.
Here is one of the closures I'm talking about:
You will be running a tapestry needle with thin cording thru the cork, so that is why it makes such a difference.  You can decorate the cork anyway you want and add charms and pearls, and flowers, or leave it plain.

It is very easy to put together, just sew up a side, bottom and sew in a casing for the cord.   You can make it out of any material and embellish how you like.

The theme of our anniversary party was vintage/elegance, so I thought the linen and lace would be a good fit.
Remember, all wine bottles are not the same size, so I suggest you buy the bottles first, then make your pattern from their size. ( I always learn the hard way, so I had to take my bags with me and made sure the bottles would fit.)

If you embellish your corks, make sure to use a secure glue to hold your items on.  It will be sliding back and forth, so it will be handled alot.
These would also work for bottles of "sparkling water" for those of us that prefer non-alcoholic beverages.

I hope you give these a try.  Also , please visit Linda at http://cardsbylinda.blogspot.com.   She is the wonderful, talented lady that inspired me to make these gifts.

Wednesday, June 27, 2012

Fancy packaging

I have found it is just as fun decorating and packaging the project , as it is to make the project.

I didn't have a gift bag big enough for my baby album, so I just made one.  I used some teal fabric out of my stash.  I just folded a 1/4 yard of fabric in half and sewed up the sides.  I cut the top with pinking shears and had a gift bag in 5 minutes.


I ripped a 4 inch piece of linen into a strip, frayed it on the edges with a wire brush, and tied it into a bow.   I added a flower, seam binding  and small flowers to the ends of the bow.

I made a tag , cut from a manila folder, and embellished it.  I made a ribbon rose from a teal and beige organic ribbon, lace,  and added other flowers and leaves.
You now have 2 gifts in one.  The bag can be "re-purposed" , and the gift that is in the bag.
My fabric stash now will be getting smaller, because all I want to do is make gift bags.   I would love to see any "fancy packaging" you do with a gift.  Send me a photo.  "Happy Wrapping!"

Sunday, June 24, 2012

Baby Frame/ Album

It's always exciting when a new baby is coming into your family.  I always make a special gift for my nieces and nephew's first baby.  How do you make a gift when there is no theme, no colors, no names, and no sex of the baby yet???  (They are waiting to pick all this out when the baby comes.)

I went to their baby registry and saw that the new "baby neutrals" are blues, greens, oranges, and brown.   So I took the colors from the onsies and baby accessories they picked out and began to create.

I didn't just want to just alter a frame; I wanted it to be more than a frame, so this is what I came up with.


I took and 8x10 frame and added a piece to each side of the frame.  The inside of the left side of the frame can be used to document the weight and height of the baby for the first year.
The right side of the frame is for pictures for each month of the first year.
When attached, it looks like this.  The picture frame can be used for their favorite baby picture.
The outside of the book was fun to create.  I cut a tree branch from a wood grain paper and placed it where leaves would overlap the next page.  I placed magnets in the leaves and under the paper on the adjoining side so it would automatically close magnetically.
I finished up with flowers, trims and flourishes.


I hope "mommy and daddy" enjoy the gift, and they know that alot of love went into creating it.
I anxiously await the birth of my next "great nephew or niece."
Here is the baby card: (sorry, had to do some pink and blue!)


Thursday, June 14, 2012

Old fashion "Ladies Diary Card


Quick post here.  Graphic 45 has come out with the most beautiful paper line called "A Ladies Diary."
It's so beautiful and so vintage.

I couldn't wait to make a card with it.  I finished the outside.  Still have to do the inside.  I'm making it
an easel card with some stickpins.

Here is what I've done so far:  I used a "Cottage Cutz " diecut to make this lacy envelope. It was already embossed- white on white.  I took some Lindys Stamp gang " Dark Chocolate Truffle" and put some on a baby wipe.  I lightly rubbed over it and it made it a vintage effect.  I added flowers and a pink resin flower.


I used some of the chipboard that comes with the line and popped it up and added some bronze embellishments and flowers.

Here is the finished front of the card.  Love how it is turning out.


Will post the inside when I get it finished.

I am linking up with: theshabbytearoom.blogspot.com

Friday, April 27, 2012

Prayer Journals


I'm so fortunate to be a part of a women's bible study called "Within The Word (withintheword.com)
A group of women, from all ages and backgrounds,  who get together each Wednesday morning and learn about God's word.  We have an awesome teacher, Kathy, who is passionate about bringing God's word to women.  After she teaches her lesson, we break up in small groups to discuss our study guide for the week.  I'm honored to lead one of those small groups.

The ladies in my group are so special to me.  We have gone thru struggles, pain, and many blessings and praises together.  If there is a need, these women are there- whether it be a death, surgery, the birth of a baby, or you just need a shoulder to cry on.

When my mother was "eminently dying"; I had  been sitting with her for 14 hours a day for about a week.  Not knowing when or what day it was going to happen, I felt a real need to go to my bible study.  I needed to be surrounded with  my ladies, and I needed to be "charged up" with prayer.   My sister was here from Delaware and she encouraged me to go while she would sit with mom. 

  We have a wonderful "prayer warrior" in our study that prays at the end of each session.  We all hold hands, and Linda holds all the prayer requests in her hands.  If someone has a extra burden that day, you stand with her as she and the other women have their hands on you and prays.  It's like 40 hearts connect, and that is what comes out of Linda's heart and her beautiful prayer.

Our semester is getting close to the end and I wanted to make something special for each one.

I have had these vintage scripture cards for years.  They were my great aunt's and they are from the early 1930's.  I used these to be my inspiration.

I found these little mini journals from a company called Moleskine.  They carry all sizes and colors of these journals and they take crafting and mixed media very well.  This is what they look like plain.


I made each journal very different from the other, just like the ladies are different in their own 
unique way.


You know me, I'm very " girlie-girl" , but I know that all women are not as "prissy" as I am; but I did sneek in a couple of shabby chic style journals.


The dress form journal was alot of fun for me.  I got to use some of my vintage lace, buttons and pins from my grandmother's collection, passed down to me.  I tried to find a "scripture card" to match the theme of the journal.


I love pink and black together.  It has an elegant formal look, but also very femine look.
I love lavender , and so I combined it with some silver leafing and rhinestones. I made a beaded stick pin to match.
I had some darling miniature silver spoons and thought it would be cute to make a "shabby tea cup"
journal in soft powder blue.  


Nothing says feminine like pink pearls.  I had these resin distressed crosses that I added, along with flowers and buttons.

I had these "charm pins" in my stash and thought it would be a neat way to spell out "pray" with some letter charms.  The journal was decoupaged with tissue paper and I stenciled some background flowers and butterflies with pastel chalks.
I somehow seem to shy away from bold colors, but thought this yellow and turquoise looked yummy together.  I made the yellow rose out of gingham ribbon.

I love making flowers out of sheer fabrics.  Especially if it has sparkles on it!!  I dry embossed the paper, and then went over it with pastel blue chalk.

I have several more to make, but have had so much pleasure from creating each of these journals for each special lady. 

I encourage each and every one of you ladies, if you are not involved in a bible study, please make an effort to find one.  Each church offers their own studies.  You don't have to be a member of a church to attend a bible study.   If you are already in one, I would love to hear about it and what you are studying at the moment.   Feel free to leave it in my comment area.

Blessings to you all,
Cindy

Friday, April 6, 2012

Easter project


There is a crafter's blogland that is chocked full of crafting
tutorials to show us "crafty " people how to make anything.
And I do mean anything. One of my favorite blogs is :
iluvvintagescrap.blogspot.com. She makes the cutest and
most lovely projects, I have ever seen. She takes everyday
things and remakes them into beautiful creations.
I saw this egg carton idea on her blog and thought it would
be fun to make a couple of these for the girls.

Take cardboard like egg carton like below and cut it into
sections. ( I used one that held 18 eggs) and cut it into thirds.

I then painted each one a different color with acrylic
paint. These absorb the paint, so put it on thick.
After they dry, start decorating!
I painted the first one light pink, added some scrapbook
paper and then embellished with flowers, stickers and
trim.
I used a fabric glue to attach all my items.

The next was a purple shade.


The last was a dark aqua or turquoise color.

Each one is different and fits the personality of each
granddaughter.

Here is a side view of the cartons.
I used a small piece of scrapbook paper on inside of cover,
wrote a little note and decorated the corners.


I then put some shredded colored grass in each hole
and filled them with goodies.
The possibilities are endless with this project. You can
use this idea as a fun way to do a unique gift presentation
and fill with bath products, craft items ,etc...
I hope everyone has a wonderful Easter and are spending
it with loved ones. I'm so thankful that Jesus died on the cross
for me and many others.
Happy Easter, Cindy